What Is a Counter Sample in Garment Manufacturing? (And Why Brand Owners Need It)
If you’re a brand owner, your biggest fear in production is simple: the bulk doesn’t match what you approved. Colors drift, stitching changes, fit feels “almost right,” and suddenly your product isn’t your product anymore. That’s exactly why Counter Samples exist. A Counter Sample is not just “another sample.” It’s the official physical reference that both you and the factory use to keep bulk production consistent like a real-world contract you can touch, measure, and compare against.
Types of Garment Samples In Garments Factory:
- Prototype Sample in Garment Production? (And How to Make One Step-by-Step)
- Fit Sample and Why You Need It in Garment Production.
- Size Set Sample: What It Is, Why You Need It.
- Counter Sample in Garment Manufacturing? (And Why Brand Owners Need It)
- Salesman Sample, And When Do You Really Need One?
- Pre-Production Sample (PP Sample) in Garment Manufacturing, and Why It Matters More Than You Think
- Top Production Sample (TOP Sample), and Why Brand Owners Actually Need It
- Shipment Sample in Garment Manufacturing?
In this guide, you’ll learn:
- What a Counter Sample is (in plain language)
- When you need it in the timeline
- What it must include to protect your brand
- How to use it to control quality and avoid disputes
- Common mistakes brand owners make and how to avoid them

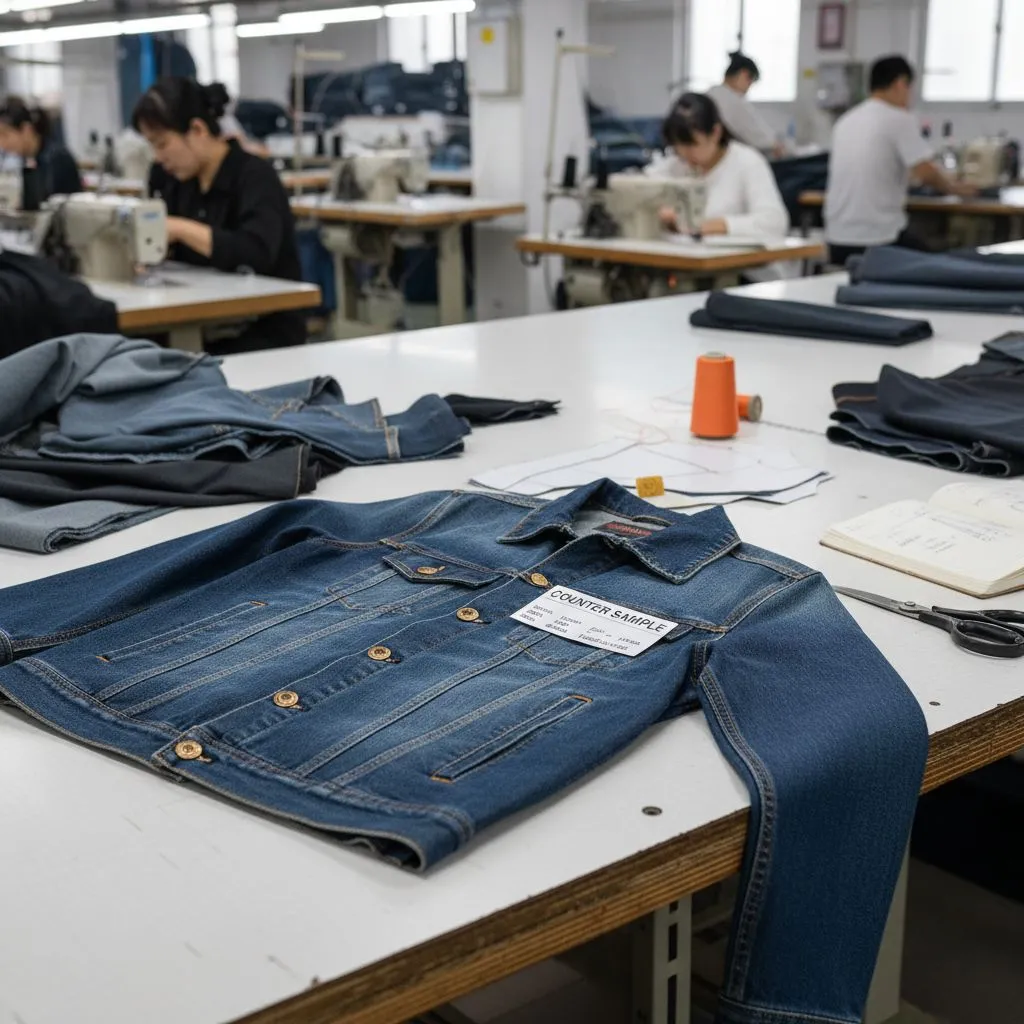
What Is a Counter Sample?
A Counter Sample (also called a reference sample or counter/approved standard) is the final benchmark sample used to compare against:
- pre-production outputs
- in-line production pieces
- final random inspections
- finished bulk goods
Think of it as your “golden standard”.

In simple terms:
- Whatever you approve becomes the rule.
- The factory uses that rule to keep bulk consistent.
- QC uses it to judge pass/fail.
- If there’s a problem, it’s the first thing everyone checks.
Why Counter Samples Matter for Brand Owners
Here’s the pushback you might feel: “I already approved a fit sample / size set / PP sample… isn’t that enough?”
Not always. Because approvals can be spread across emails, comments, photos, and multiple sample rounds. Without one final physical reference, people interpret details differently during bulk. A Counter Sample protects you in three ways:
- It locks the product standard
- It reduces bulk risk and rework cost
- It prevents “we understood differently” disputes
1) It locks the product standard
It sets a single truth for:
- fabric hand-feel and weight (GSM)
- color and tone
- fit and measurements
- stitching and seam quality
- labels, trims, artwork placement
- finishing and pressing level

2) It reduces bulk risk and rework cost
When you have a clear Counter Sample, the factory and QC team can catch mistakes early—right at the first output, not after hundreds of pieces are finished. That means you avoid expensive problems like un-stitching, re-sewing, re-printing, or re-washing, which can quickly blow up your budget and delay shipping. It also reduces the chance of “silent drift,” where small differences (stitch density, label placement, seam shape) slowly change across production days. In the end, a Counter Sample saves money because it makes corrections small and early, instead of big and late.
3) It prevents “we understood differently” disputes

If something goes wrong, both sides can compare bulk to the Counter Sample and decide fast. In bulk production, many details can be interpreted differently like what “clean finishing” means, how tight a stitch should look, or where a logo should sit. A Counter Sample removes the guessing because it gives both you and the factory one physical “truth” to compare against. If a problem happens, you don’t have to argue from screenshots or memory—you can point to the Counter Sample and decide quickly whether the bulk matches the approved standard. That makes conversations faster, calmer, and more professional, especially when timelines are tight.
Counter Sample vs Fit Sample vs Size Set Sample
| Sample Type | Main Purpose | Sizes | Material Accuracy |
|---|---|---|---|
| Fit Sample | Check fit and silhouette | 1 size | May use substitute fabric |
| Size Set Sample | Confirm grading across sizes | Multiple sizes | Usually accurate |
| Counter Sample | Final production standard for QC | 1 or more | Must match bulk standard |
When Do You Need a Counter Sample?
Most brands should use a Counter Sample at two moments:
1) Before bulk starts (Pre-Production stage)
Once the final version is approved, the Counter Sample becomes the factory’s standard for:
- PP meeting alignment
- cutting reference
- sewing line instructions
- finishing expectations
- QC checklists
2) During bulk (In-line and Final inspection)
The Counter Sample is used to compare against:
- first output from the line
- random in-line checks
- final AQL inspection samples
If the bulk differs from the Counter Sample, the factory must fix it fast.
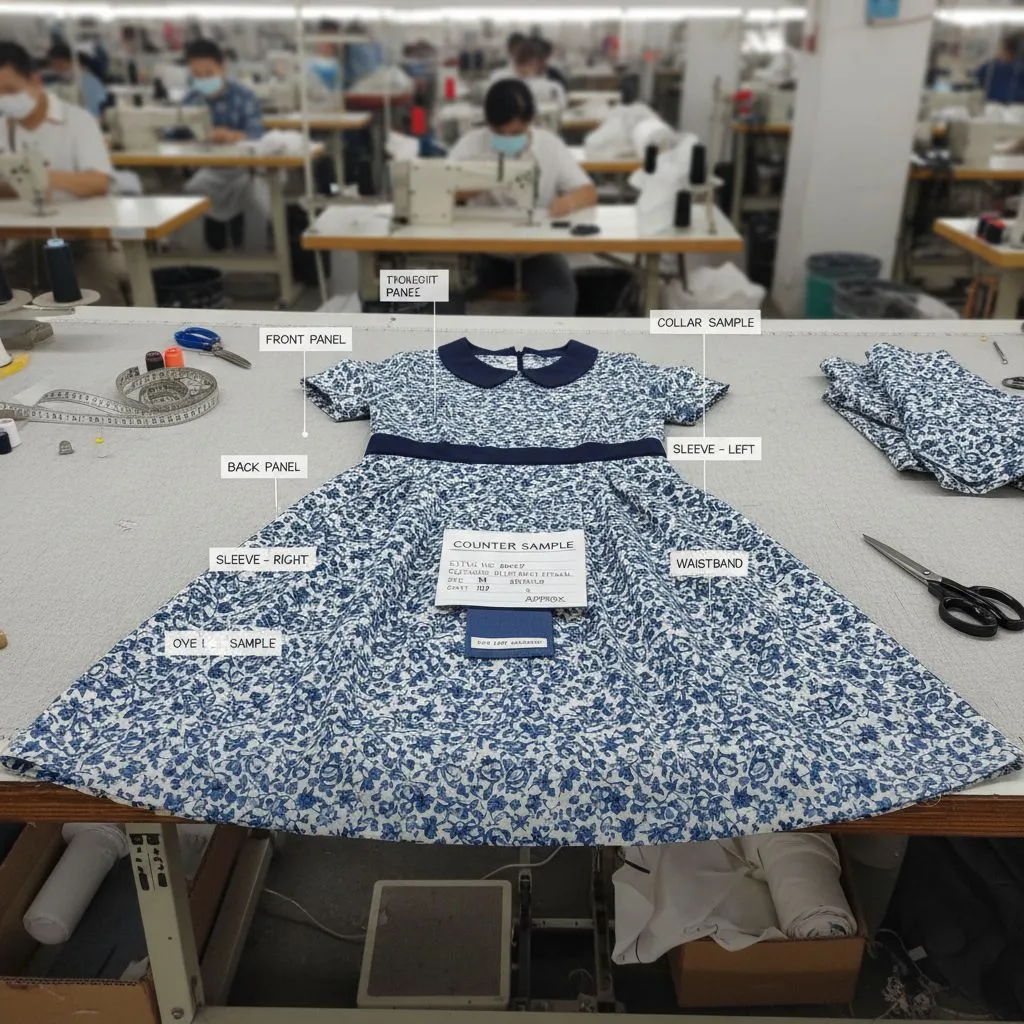
What Must a Proper Counter Sample Include?

If you want the Counter Sample to actually protect you, it needs more than “looks right.” Here’s what you should require:
- Correct materials (no substitutes)
- Correct construction and workmanship standard
- Correct measurements and tolerances
- Correct artwork placement and branding details
- Identification and control
A) Correct materials (no substitutes)
- exact fabric type, composition, and GSM
- correct lining/interlining
- correct trims: zipper, buttons, elastic, drawcord, hardware
- correct label materials and print quality
If the Counter Sample uses “similar fabric,” it becomes useless in disputes.
B) Correct construction and workmanship standard
- seam type and stitch density (SPI)
- reinforcement points and bartacks
- clean finishing (thread trimming, seam allowance consistency)
- symmetry and balance (left/right match)
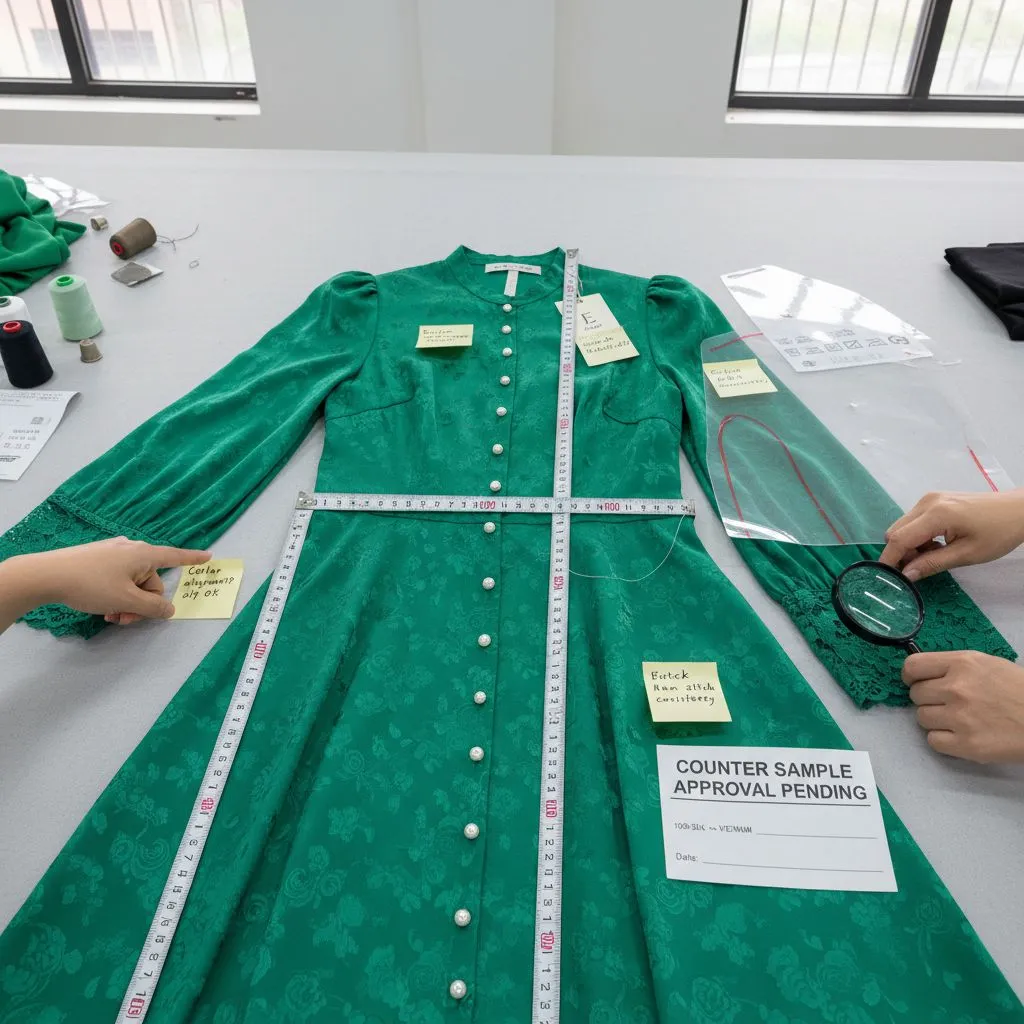
C) Correct measurements and tolerances
Counter Sample should match the final measurement spec you approved. Also define:
- tolerance rules (example: chest ±1.0 cm, length ±1.0 cm)
- where and how to measure (POM method)
D) Correct artwork placement and branding details
For prints/embroidery:
- placement coordinates from reference points
- size of artwork
- color standard (Pantone or approved lab dip)
- embroidery density + backing rules
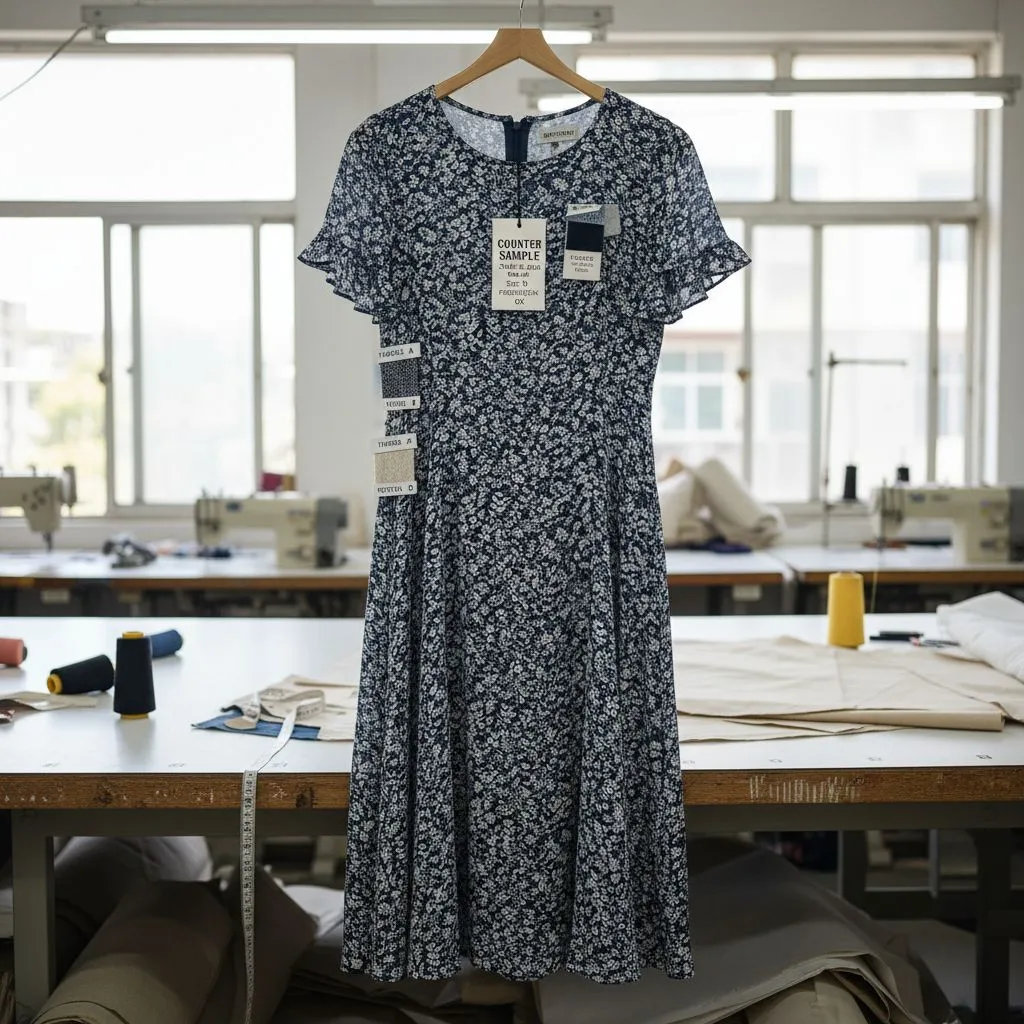
E) Identification and control
A real Counter Sample must be controlled, not “floating around.” It should have:
- style name / code
- season / drop
- size
- date of approval
- version number (v1, v2, final)
- signatures/approval note (buyer + factory)
How to Use Counter Samples in Production (Brand Owner Workflow)
Here’s a practical way to run it as a brand owner even if you’re small:
Step 1: Confirm the “Final” version
Before you call anything a Counter Sample, make sure: fit is approved, spec is finalized, fabric + trims are finalized, and artwork placement is finalized. If you still expect changes, it’s not final.
Step 2: Request 2 – 3 Counter Samples (not just 1)

Best practice: 1 piece stays at the factory (QC + production standard), 1 piece stays with you (your internal standard), and 1 piece for third-party inspection (optional but smart). If you only have one sample, you lose control when it’s misplaced, altered, or damaged.
Step 3: Lock it with an “Approved Counter Sample” record
Ask the factory to attach a Counter Sample sheet that lists confirmed materials, measurement chart, workmanship standard, artwork placement reference, and a photo set (front/back/close-up critical points).
Step 4: Use it in PP meeting and pilot run
During PP meeting, require the line to compare first output vs Counter Sample, QC to align check method, and factory to confirm tolerance and critical defects list.
Step 5: Require Counter Sample comparison during inspections
Tell QC/third-party inspectors: use Counter Sample as primary visual reference, check critical points that matter to your brand, and report any drift as “against counter standard.”
Common Counter Sample Mistakes Brand Owners Make
- Mistake 1: Approving from photos only – Photos hide: fabric hand-feel, stretch behavior, color shift under lighting, puckering or stitch tension issues… If possible, approve a physical Counter Sample for the final standard.
- Mistake 2: Letting “PP sample” = Counter Sample without documentation – A PP sample can become a Counter Sample, but only if clearly labeled and controlled. Otherwise, the factory may use a different version later.
- Mistake 3: Not defining tolerance rules – Without tolerances, every measurement dispute turns into argument.
- Mistake 4: Counter Sample uses substitute fabric or trims – Then the bulk will never match it perfectly – and everyone will blame everyone.
- Mistake 5: No version control – If you approve v2 but the factory keeps v1 on the line… bulk goes wrong quietly.
Final Thoughts: The Counter Sample Is Your “Bulk Insurance”
As a brand owner, you’re building trust with customers. Consistency is not optional—it’s the product. A Counter Sample is the simplest tool that keeps everyone aligned: your design intent, the factory’s execution, QC’s judgment, and the final bulk output. If you want your production to scale without chaos, start treating Counter Samples as non-negotiable.
FAQS About Counter Sample
What is a Counter Sample in garment production?
Counter Sample is the final physical sample used as the “gold standard” for bulk production. It shows exactly what the approved product must look and feel like. The factory and QC team compare bulk pieces to this sample during production and final checks. For brand owners, it’s the clearest way to lock quality and consistency.
Is a Counter Sample the same as a PP Sample or Approval Sample?

Not always, and this is where many brands get burned. A PP or Approval Sample can become a Counter Sample only if both sides agree it is the final standard and label it clearly. If there are multiple approved versions floating around, production teams may follow the wrong one. Treat the Counter Sample as one controlled “final answer,” not just any approved sample.
When should I request a Counter Sample?
Request it right before bulk starts, after fit, materials, trims, and artwork are confirmed. If you still expect changes, it’s too early because the “standard” will keep moving. A Counter Sample works best when it represents the final, repeatable product. This timing helps you avoid bulk starting from an outdated version.
Do I need a Counter Sample if I already approved photos?
Photos often hide problems like fabric hand-feel, stretch behavior, stitch tension, and subtle color shift. Lighting and angles can make a product look better than it really is. If your brand depends on consistency, approving a physical Counter Sample is much safer than photo-only approvals. Otherwise, you may find issues only after bulk is already made.
How many Counter Samples should a brand owner keep?
Minimum two: one stays with the factory for production/QC reference, and one stays with you as the brand standard. If possible, keep three so a third-party inspector or your internal team can reference the same benchmark. Having only one is risky because samples can be lost, damaged, or altered. More copies reduce “we don’t have the standard” excuses.
Does the Counter Sample need to be made with exact bulk fabric and trims?
Yes, ideally it must match bulk materials, trims, and finishing as closely as possible. If it uses “similar fabric” or substitute trims, it becomes a weak standard and invites disagreement later. Even small differences can change drape, shrinkage, and appearance. For brand owners, exact materials protect your expectations and reduce disputes.
What exactly should the Counter Sample match?
It should match the final approved standard for materials, measurements, construction, artwork placement, and finishing. That includes stitch quality, seam shape, labeling, and clean thread trimming. It should also reflect the correct pressing and overall “factory hand.” If the Counter Sample isn’t truly “final,” bulk consistency becomes guesswork.
What’s the biggest mistake brand owners make with Counter Samples?
The biggest mistake is poor version control approving changes but not locking a final standard. Factories may keep an older sample on the line, and bulk drifts quietly. Another common mistake is not labeling the Counter Sample clearly with style code, size, date, and final version. Without control, your “standard” becomes a moving target.
How is a Counter Sample used during production?
It’s used to set the standard at the start of production and to check first output from the line. QC compares random in-line pieces to the Counter Sample to catch drift early. It’s also used during final inspection to judge visual details and workmanship. If the bulk doesn’t match, the Counter Sample helps pinpoint what must be corrected.
What if the bulk product differs from the Counter Sample?
First, confirm whether the difference is within agreed tolerances or affects the customer-facing look. If it changes fit, feel, appearance, or branding, treat it as a real quality issue, not “normal variation.” Ask for a clear correction plan and make sure the decision is documented. If you don’t document it, the same problem may repeat in future orders.