7-Point Container Inspection Guide: How to Check Empty Containers Before Loading

In export import operations, a container is not only a means of transport but also a key factor in ensuring safety, reputation, and compliance. Inspecting the container before loading is mandatory to minimize mistakes, prevent fraud, and maintain trust. A damaged, contaminated, leaking, or tampered container can lead to serious problems such as:
- Wet cartons
- Mold and mildew
- Fabric odor contamination
- Damaged packaging
- Cargo loss
- Security incidents
- Shipment rejection
- Customer complaints
- Delays at destination
That is why an empty container should be inspected before any cartons or garments are loaded.
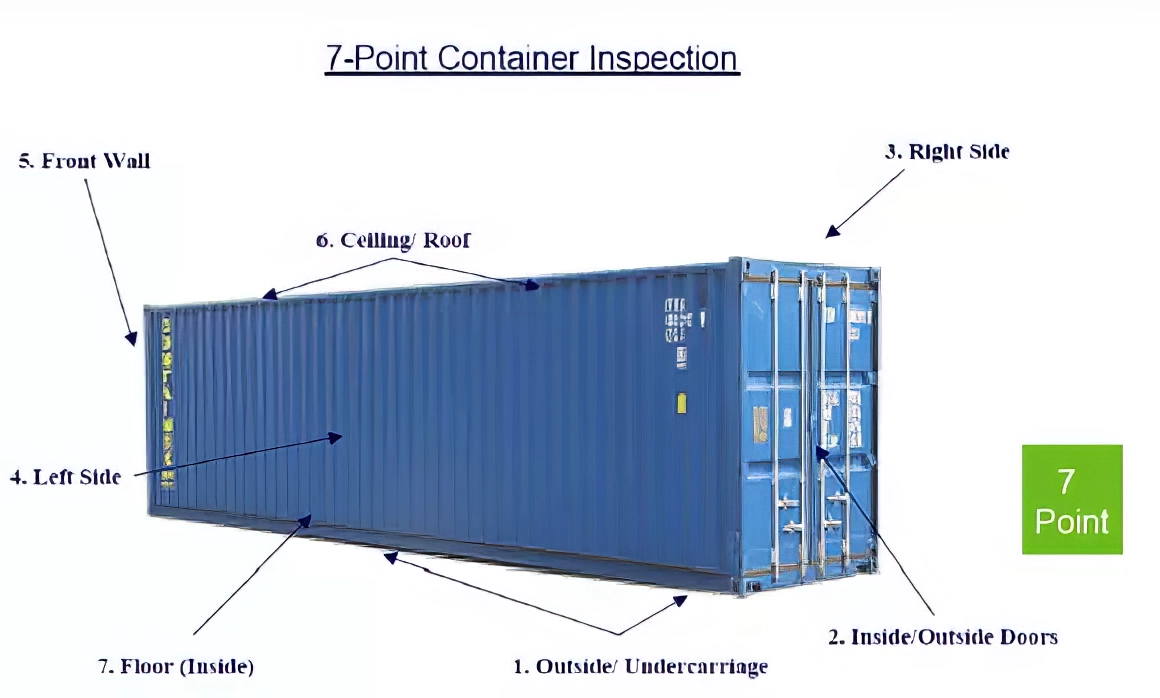
- A practical inspection sequence is: Doors – Left Side – Right Side – Floor – Roof/Ceiling – Front Wall – Undercarriage & Exterior.
- The basic rule is simple: Inspect First – Record Results – Correct or Reject Problems – Load Only After Approval.
What Is a 7-Point Container Inspection?
A 7-point container inspection is a systematic check of the main areas of an empty shipping container before cargo loading begins.
The inspection focuses on two main objectives:
- Cargo protection — making sure the container is clean, dry, structurally suitable, and capable of protecting the shipment.
- Supply-chain security — checking for unusual modifications, concealed spaces, unauthorized repairs, or evidence of tampering.
The seven areas normally checked are:
- Doors and locking system
- Left side wall
- Right side wall
- Floor
- Roof / ceiling
- Front wall
- Undercarriage and exterior

For garment shipments, inspectors should pay particular attention to water leakage, dirt, oil, odor, sharp surfaces, moisture, structural damage, and suspicious modifications.
Why Container Inspection Matters in Garment Export
Garments and textile products can be especially sensitive to the condition of the container. Finished apparel may remain inside the container for days or weeks during:
- Truck transportation
- Port storage
- Ocean transit
- Transshipment
- Destination handling
A small container problem can therefore become a much larger product-quality problem.
- For example: Small Roof Hole + Heavy Rain + Long Transit = Wet Cartons and Mold Risk
- Similarly: Chemical Residue + Closed Container + Long Transit = Odor Contamination Risk
Container inspection should therefore be treated as part of final shipment quality control rather than only as a logistics activity.
Before Starting the 7-Point Inspection
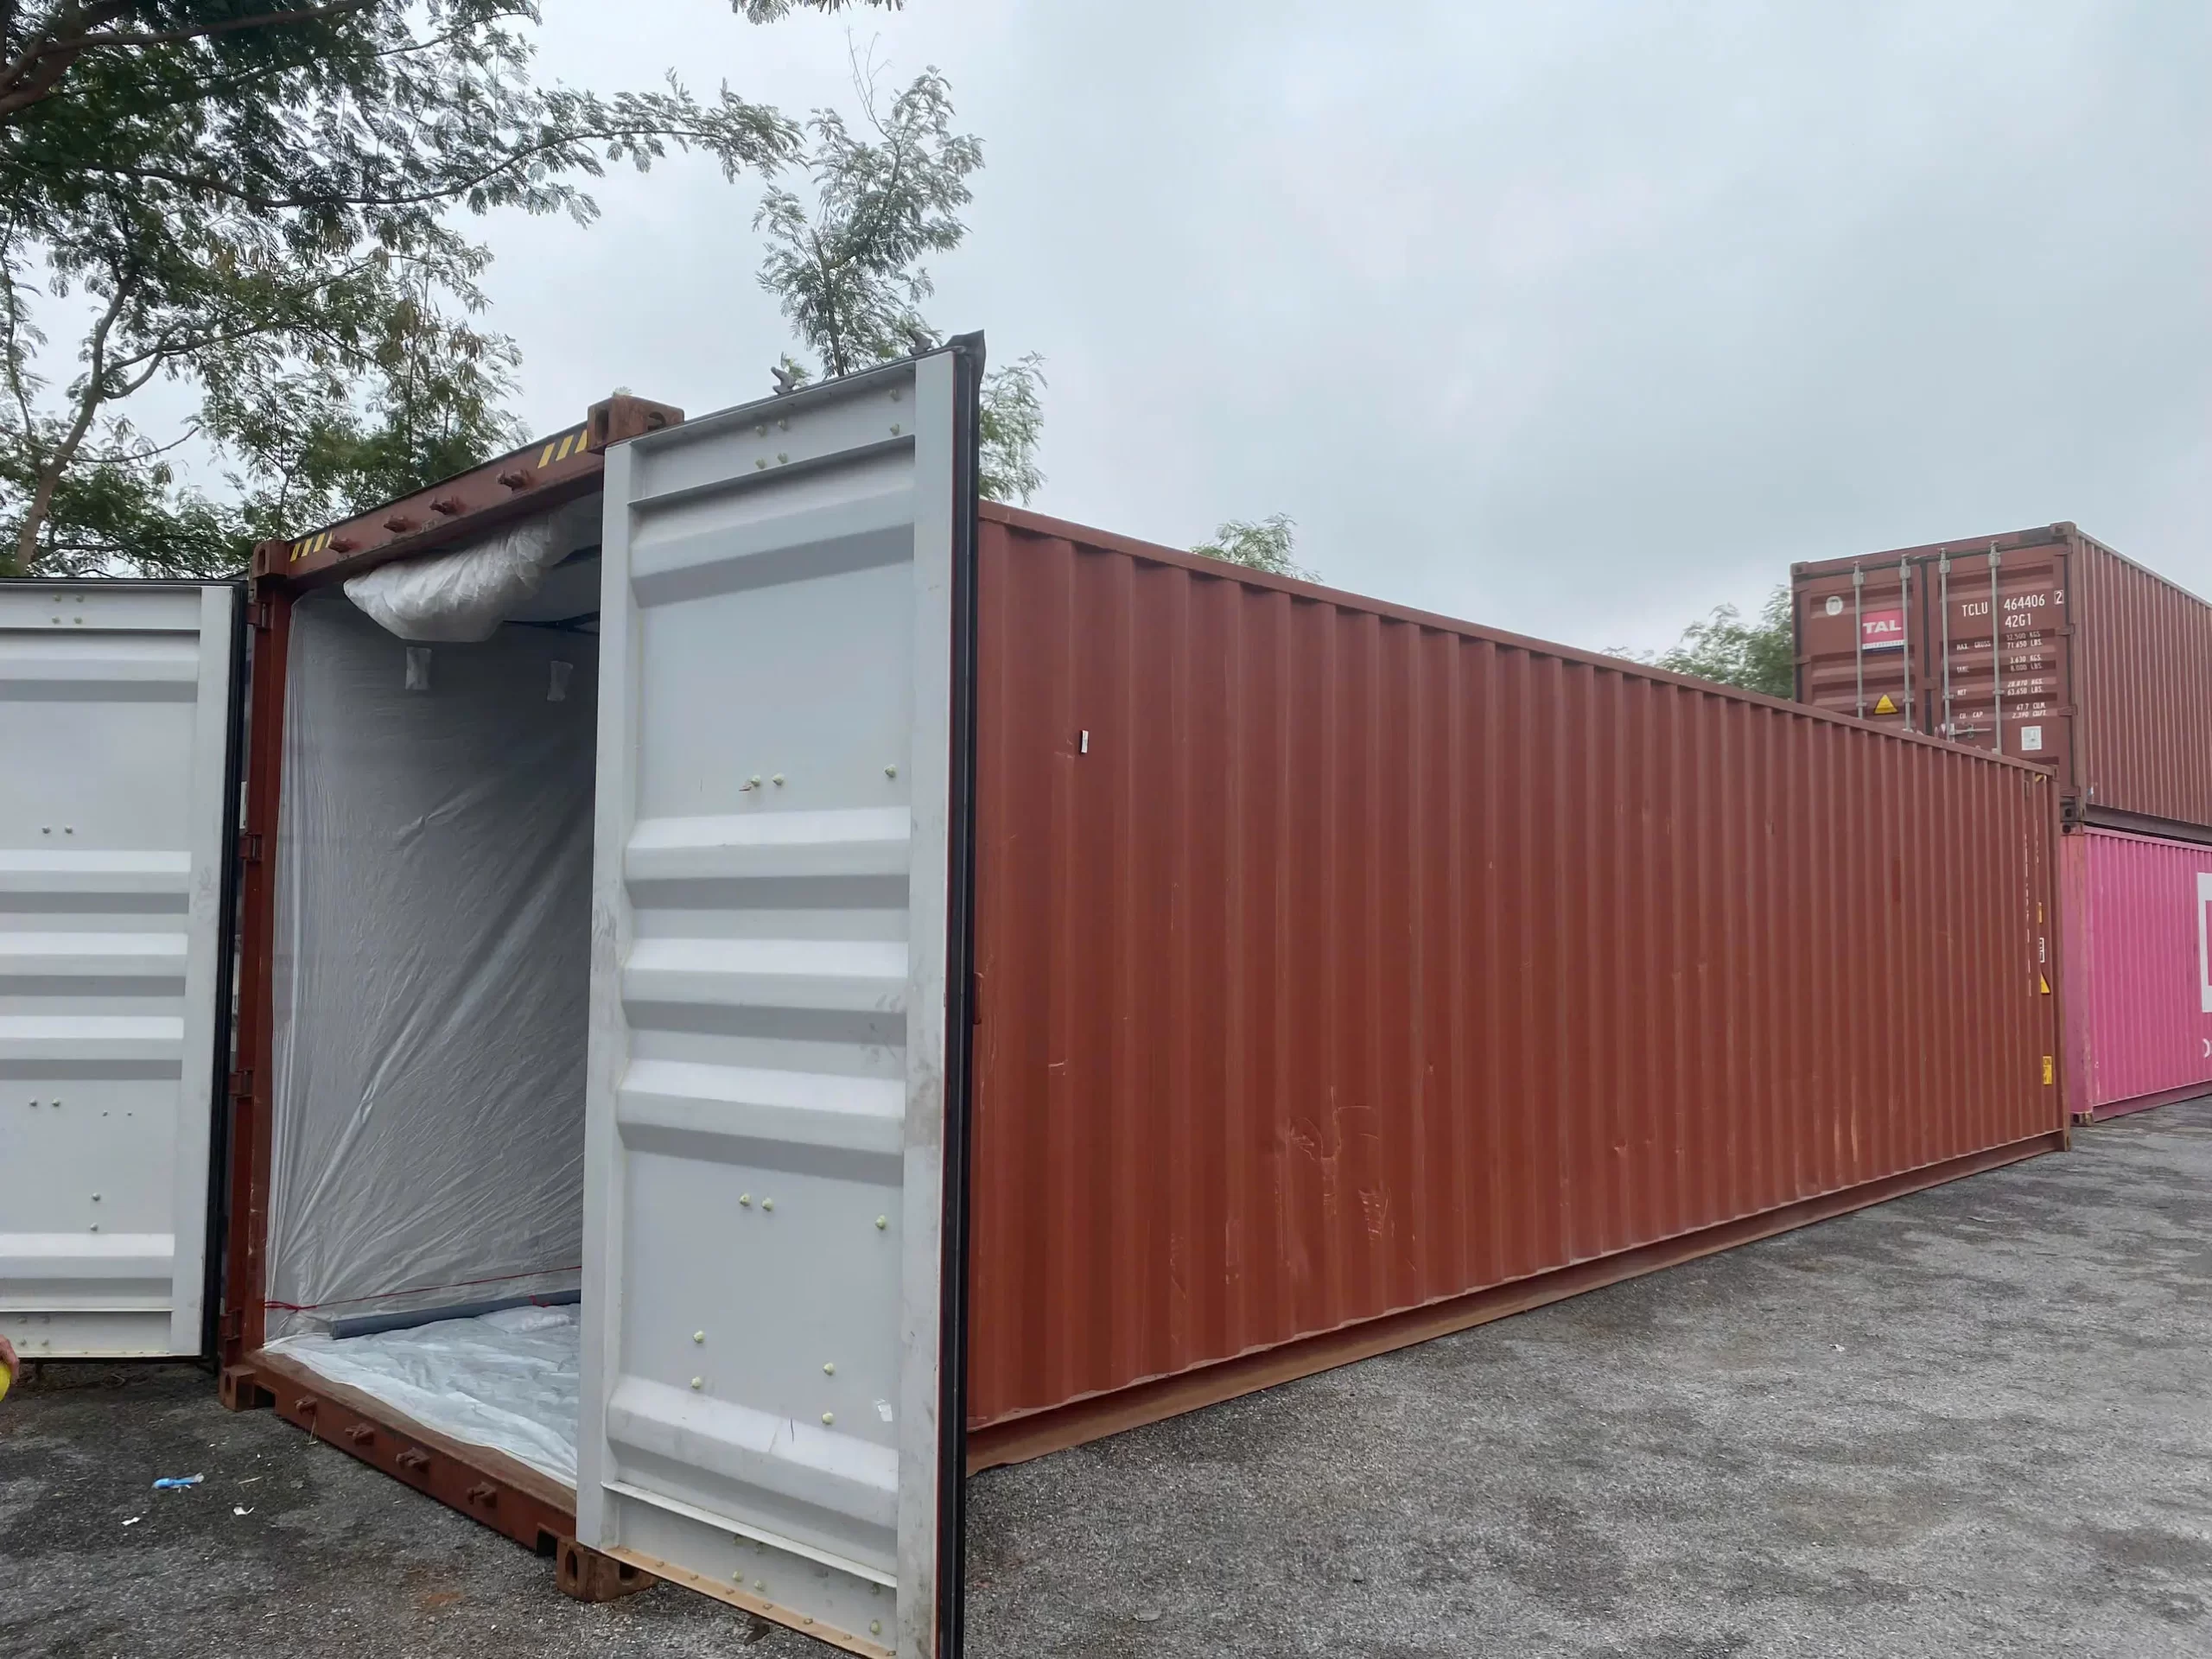
Before entering or loading the container, the responsible team should confirm the basic container information.
Check:
- Container number
- Container size and type
- Shipping documents
- General exterior condition
- Interior cleanliness
- Signs of previous cargo contamination
- Unusual odor
- Visible water
- Major structural deformation
The inspection area should also have enough lighting for the responsible person to see the container clearly. If the container condition is questionable, loading should not begin until the issue is evaluated.
7-Point Container Inspection Guide:
Step 1 – Check the Doors & Door Locks
Doors are the “frontline guardians.” Ensure locks work properly, hinges are secure, and there are no signs of drilling or re-welding on the inside. Doors should open and close smoothly without warping.
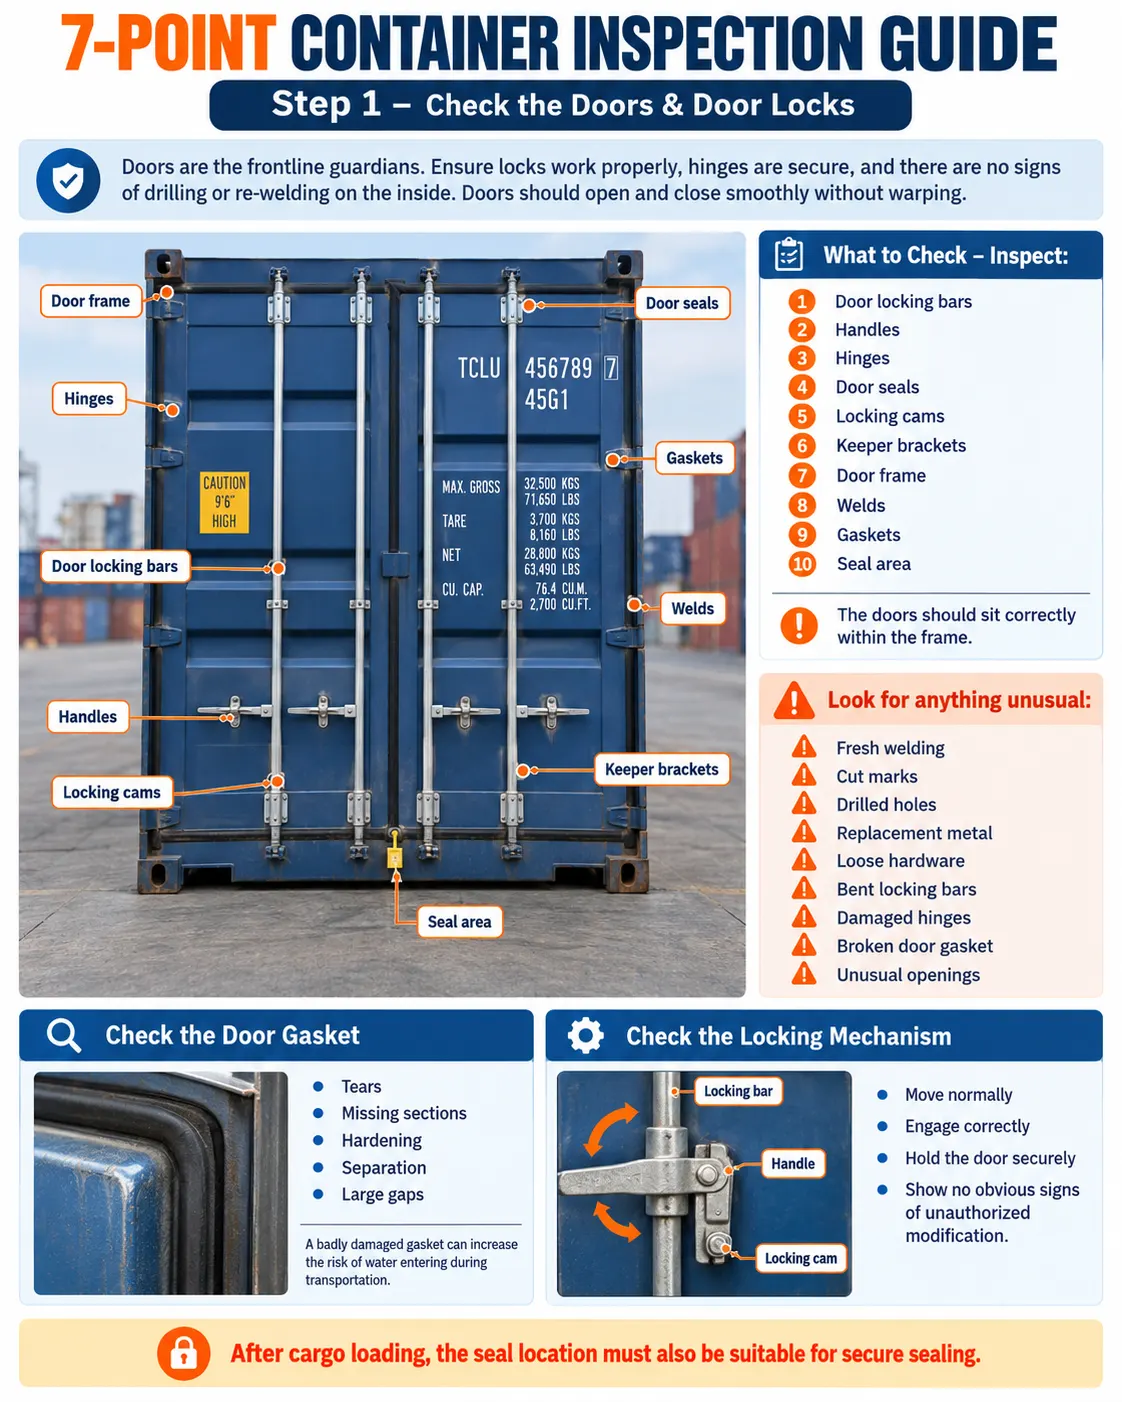
What to Check – Inspect:
- Door locking bars
- Handles
- Hinges
- Door seals
- Locking cams
- Keeper brackets
- Door frame
- Welds
- Gaskets
- Seal area
The doors should sit correctly within the frame.
Look for anything unusual such as:
- Fresh welding
- Cut marks
- Drilled holes
- Replacement metal
- Loose hardware
- Bent locking bars
- Damaged hinges
- Broken door gasket
- Unusual openings
Check the Door Gasket
The rubber gasket helps reduce water and dust entry.
Inspect for:
- Tears
- Missing sections
- Hardening
- Separation
- Large gaps

A badly damaged gasket can increase the risk of water entering during transportation.
Check the Locking Mechanism
Operate the locking bars and handles.
They should:
- Move normally
- Engage correctly
- Hold the door securely
- Show no obvious signs of unauthorized modification
After cargo loading, the seal location must also be suitable for secure sealing.
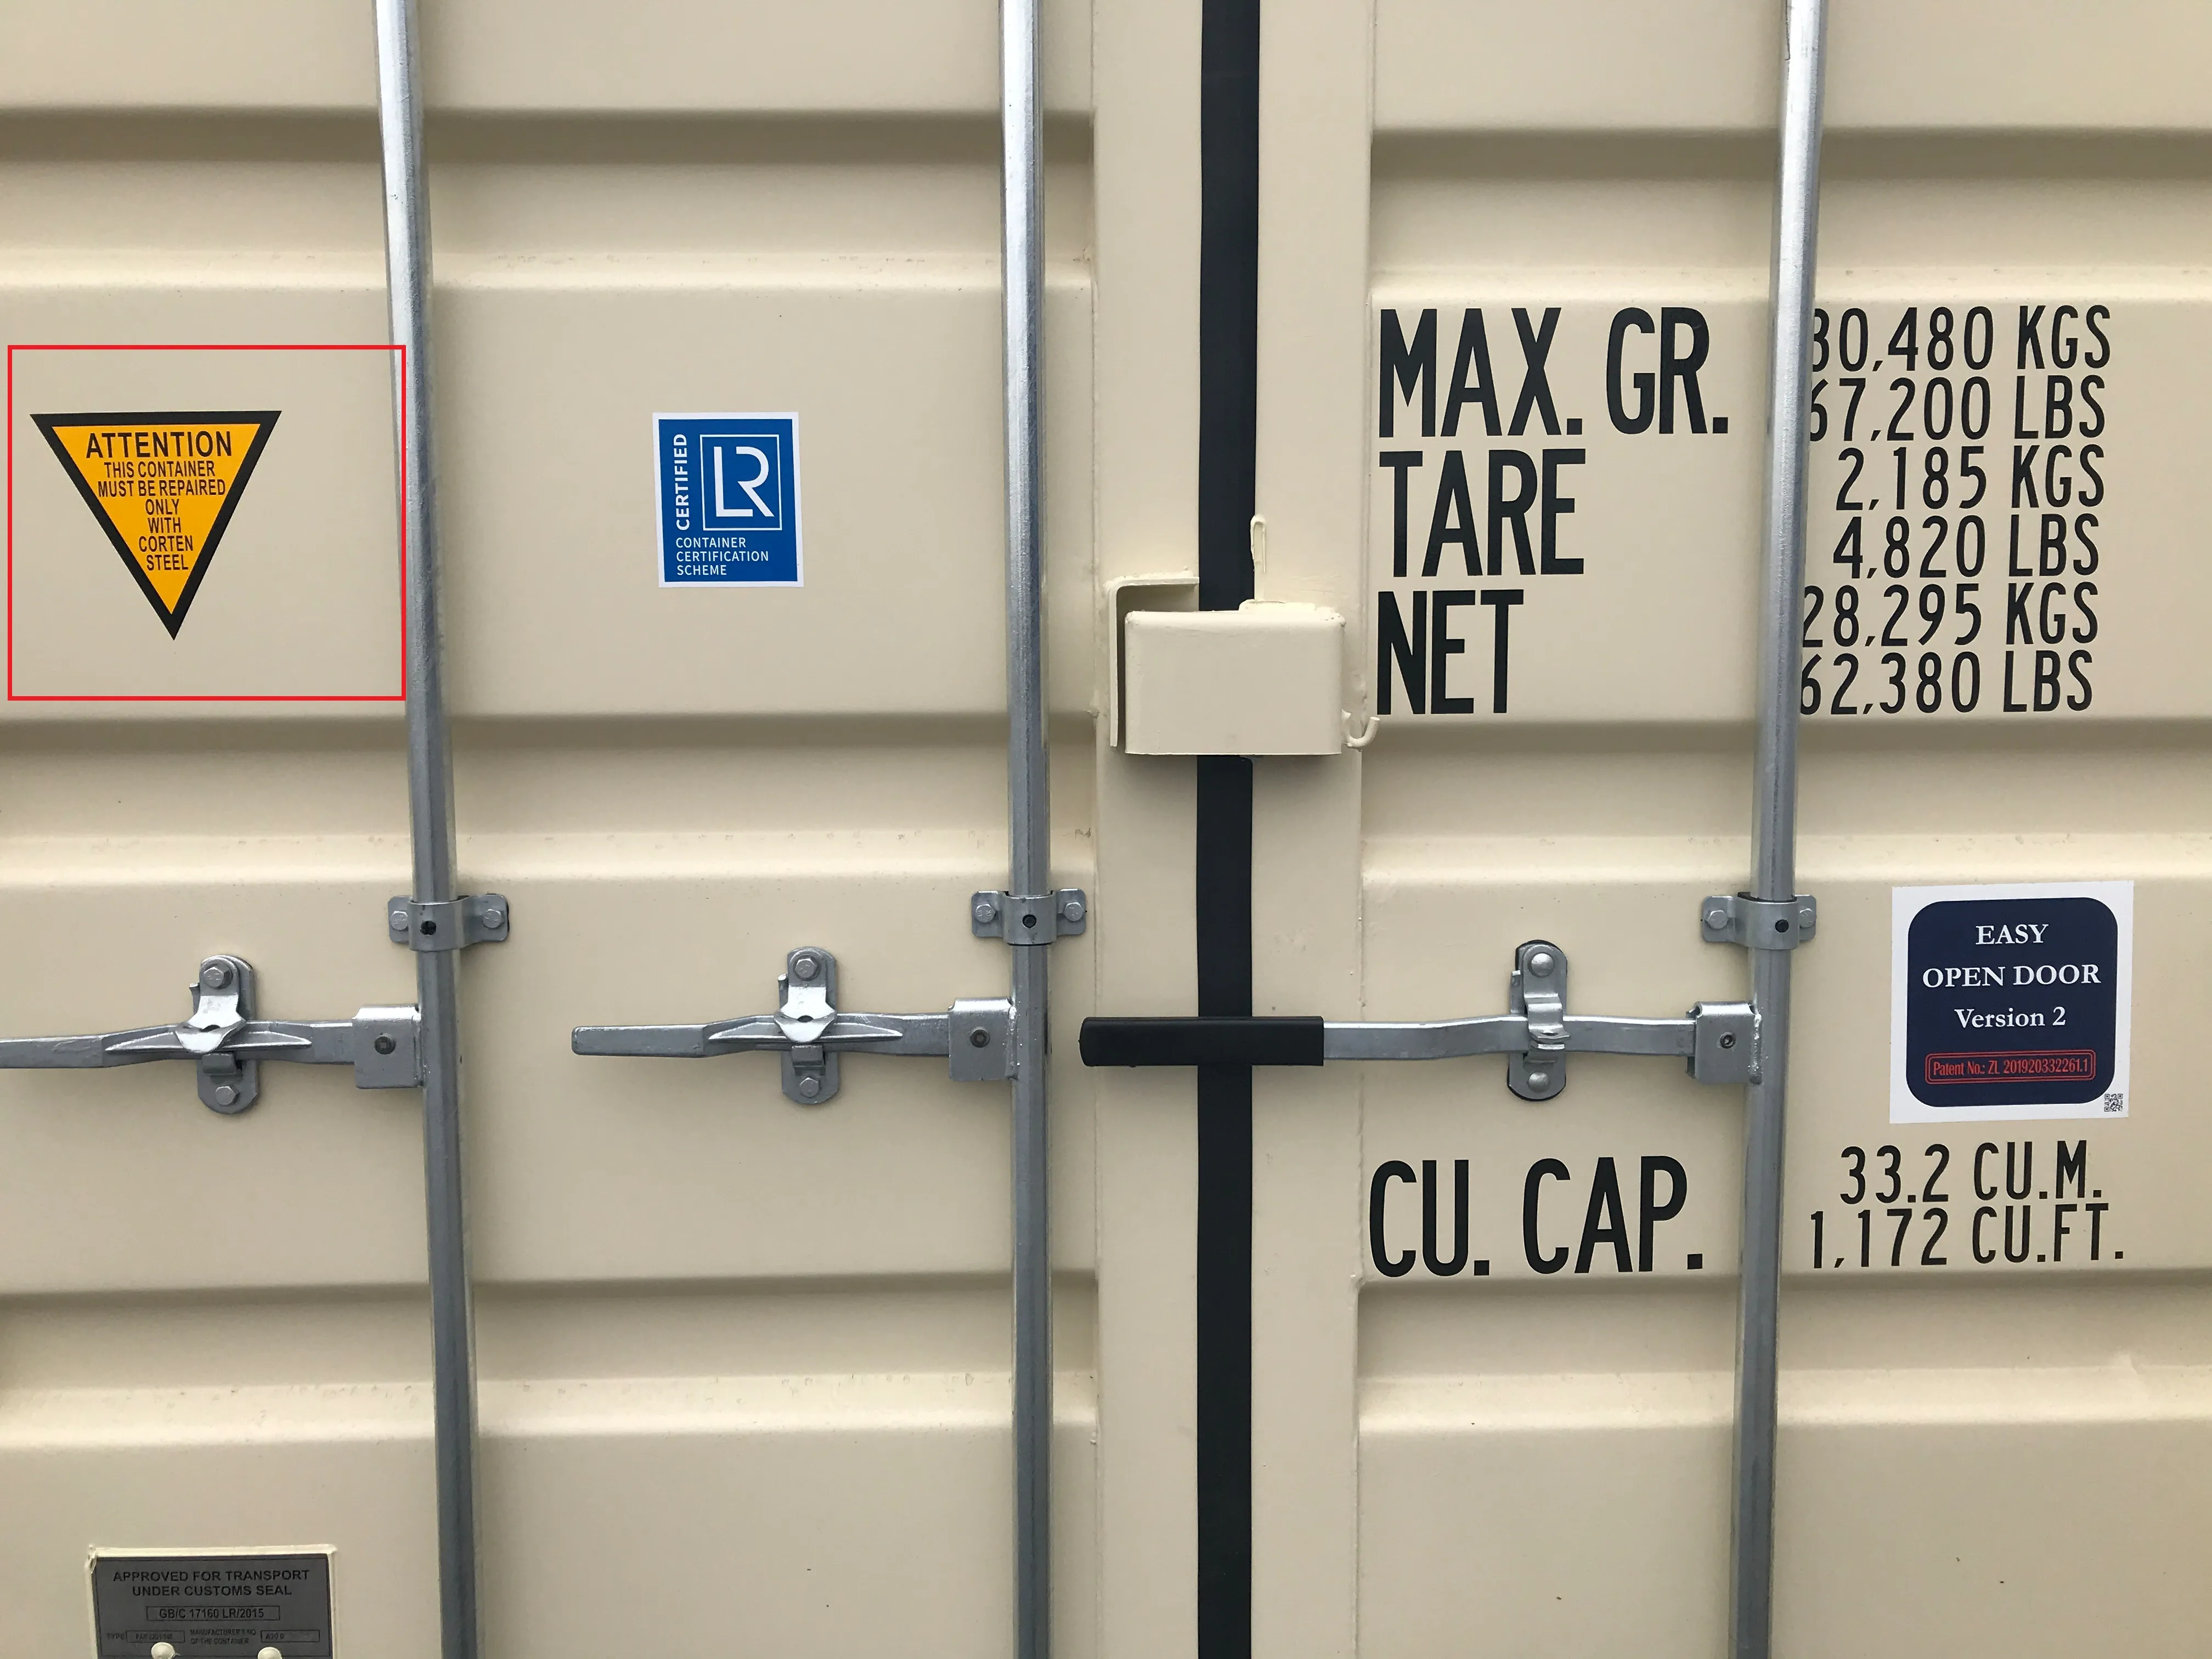
The container doors are one of the most important inspection points because they control access to the cargo area. Both doors should open and close normally without excessive force. – Container door lock inspection
Step 2 – Inspect the Left Side Wall
The left side of the container should be checked both visually and physically. Inspect from the inside and, where practical, from the exterior.
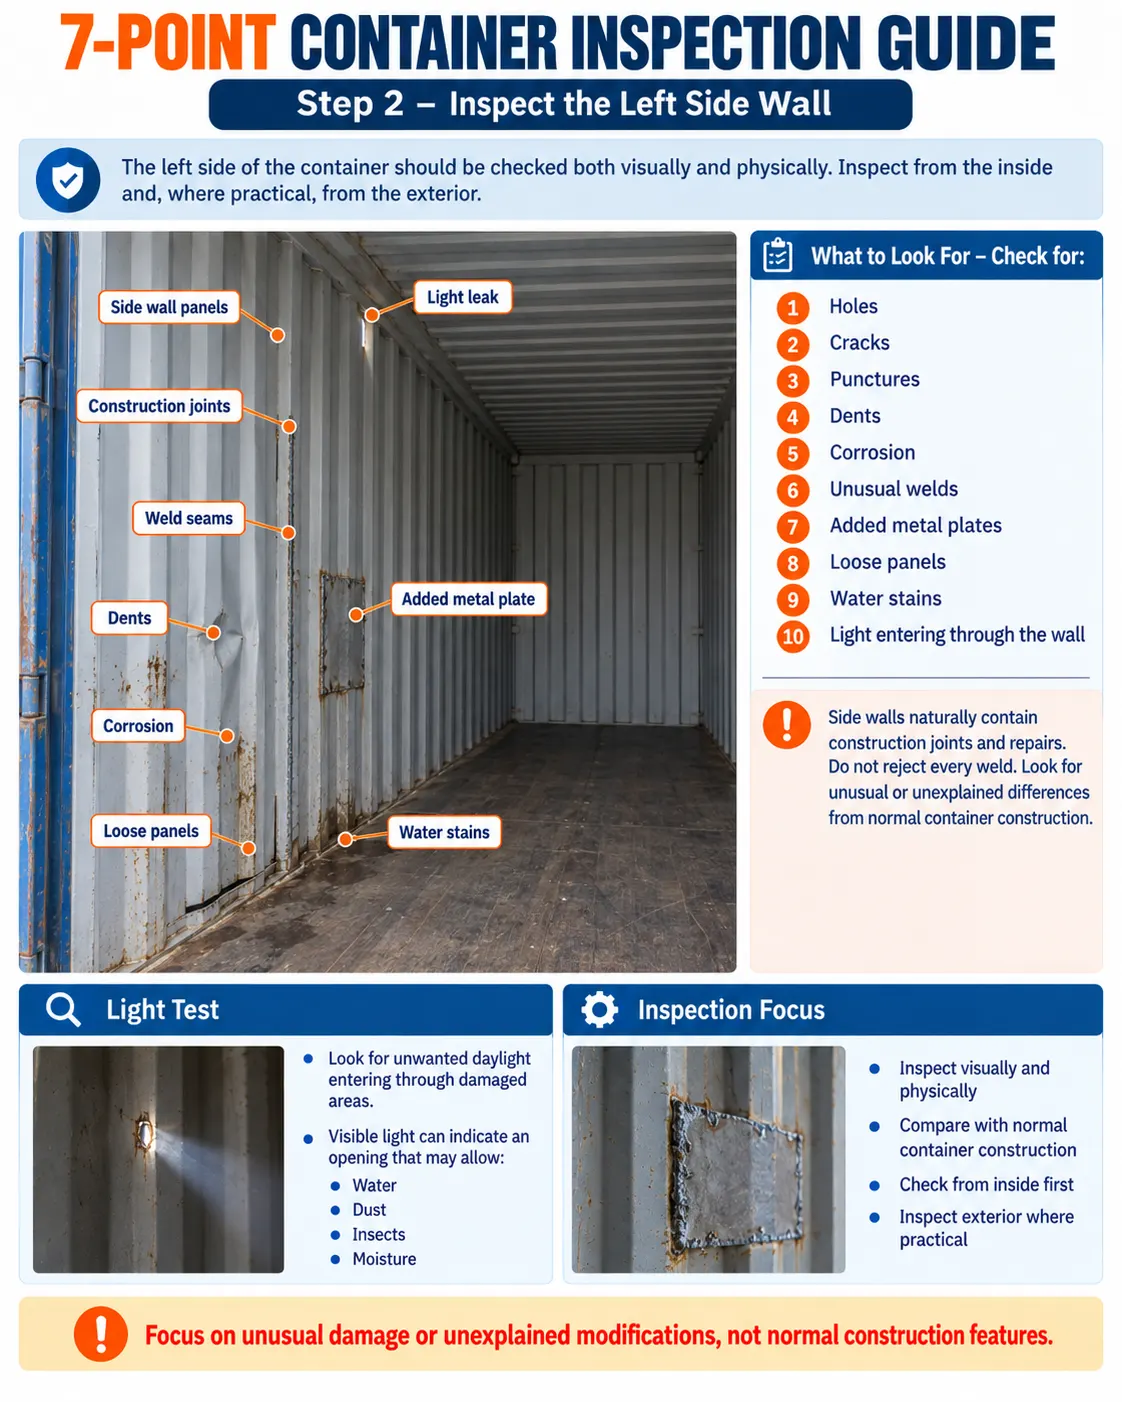
What to Look For – Check for:
- Holes
- Cracks
- Punctures
- Dents
- Corrosion
- Unusual welds
- Added metal plates
- Loose panels
- Water stains
- Light entering through the wall

Container side walls naturally contain construction joints and repairs, so the objective is not simply to reject every weld. The inspector should look for unusual or unexplained differences from normal container construction.
Light Test
With the doors positioned appropriately for inspection, look for unwanted daylight entering through damaged areas. Visible light can indicate a hole or opening that may allow:
- Water
- Dust
- Insects
- Moisture
to enter during transportation.

Inspecting container side panels – Check both inside and outside surfaces for subtle signs of manipulation like added welds or irregular seams. Ensure the panels are perfectly sealed so no light shines through from the outside.
Step 3 – Inspect the Right Side Wall
The right side should receive the same level of inspection as the left. Do not assume that checking one side is enough.
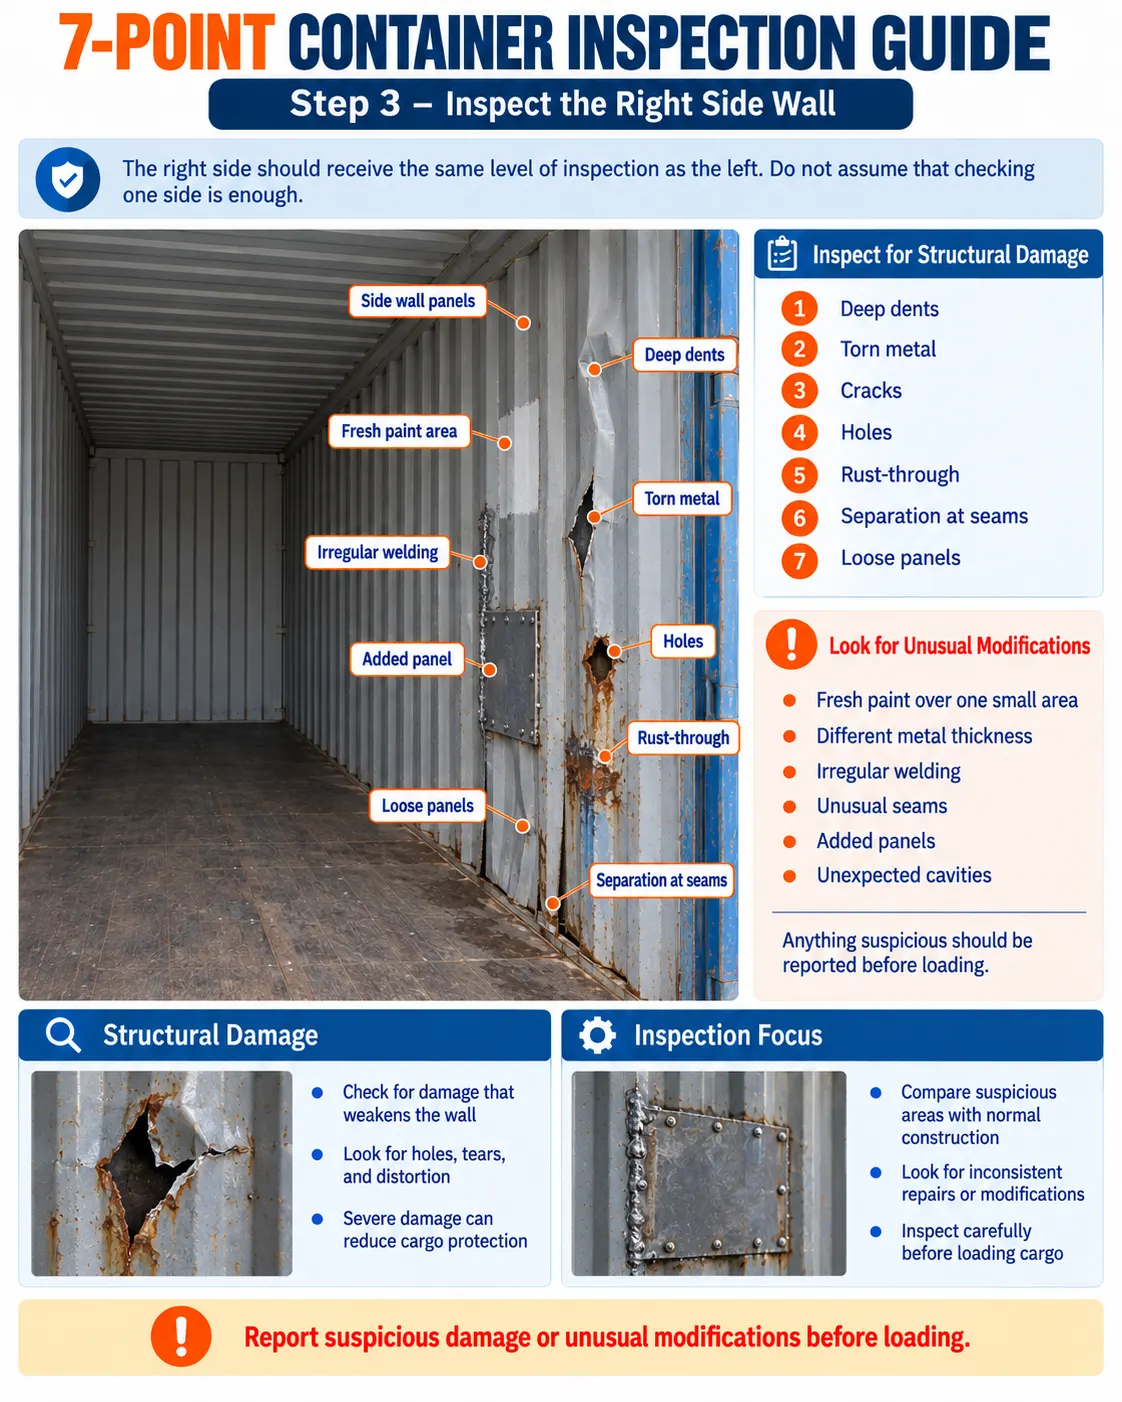
Inspect for Structural Damage – Look for:
- Deep dents
- Torn metal
- Cracks
- Holes
- Rust-through
- Separation at seams
- Loose panels
A severely distorted wall may affect container integrity and reduce cargo protection.
Look for Unusual Modifications
Check whether any section looks inconsistent with the rest of the container. Possible warning signs include:
- Fresh paint over one small area
- Different metal thickness
- Irregular welding
- Unusual seams
- Added panels
- Unexpected cavities
Anything suspicious should be reported before loading.
Step 4 – Inspect the Container Floor
The floor is extremely important for garment shipments because cartons will normally sit directly on it or on protective material placed over it. A poor floor can damage cargo even when the container walls and roof are acceptable.
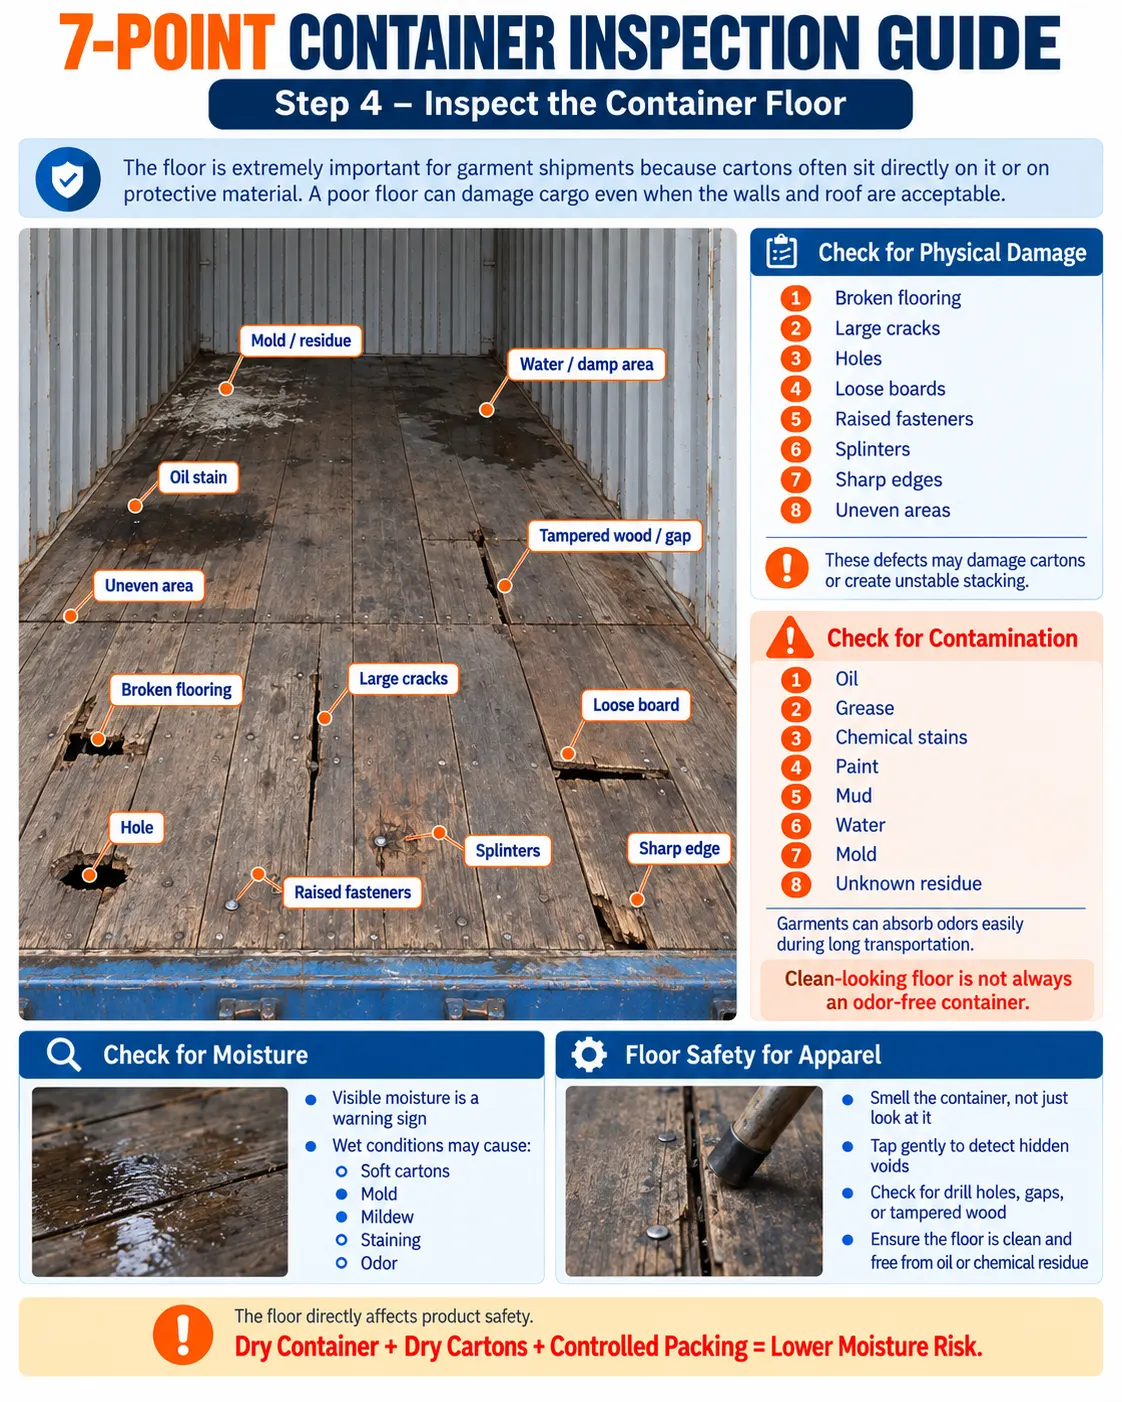
The floor directly affects product safety. Look for drill holes, gaps, or tampered wood. Tap gently to detect hidden voids. Ensure the floor is clean, free from oil stains or chemical residues that could ruin your garments.
Check for Physical Damage – Inspect for:
- Broken flooring
- Large cracks
- Holes
- Loose boards
- Raised fasteners
- Splinters
- Sharp edges
- Uneven areas
These defects may damage cartons or create unstable stacking.
Check for Contamination – Look carefully for:
- Oil
- Grease
- Chemical stains
- Paint
- Mud
- Water
- Mold
- Unknown residue
Garments can absorb odors surprisingly easily during long transportation. Therefore: Clean-Looking Floor isn’t Odor-Free Container The container should also be checked by smell.
Check for Moisture
The floor should be reasonably dry before loading. Visible moisture is a warning sign. Wet or damp conditions can contribute to:
- Soft cartons
- Mold
- Mildew
- Staining
- Odor
For apparel shipments: Dry Container + Dry Cartons + Controlled Packing = Lower Moisture Risk.
Step 5 – Inspect the Roof / Ceiling
Roof damage is easy to overlook because inspectors naturally focus on the floor and walls. However, roof holes are particularly dangerous during rain and ocean transportation.
Check From Inside
Look upward across the complete ceiling. Inspect for:
- Holes
- Punctures
- Cracks
- Corrosion
- Water stains
- Bent sections
- Unusual repairs
If daylight is visible through the roof where it should not be, the container may not be weather-tight.
Why Roof Damage Is Serious
Even a small leak can affect many cartons during long-distance shipment. Possible consequences include: Water Entry – Wet Cartons – Increased Humidity – Mold / Staining / Odor. For garments packed in paper cartons, preventing water entry is particularly important.
Step 6 – Inspect the Front Wall
The front wall is located opposite the container doors. Because it is far from the loading entrance, it is sometimes inspected too quickly. That is a mistake.
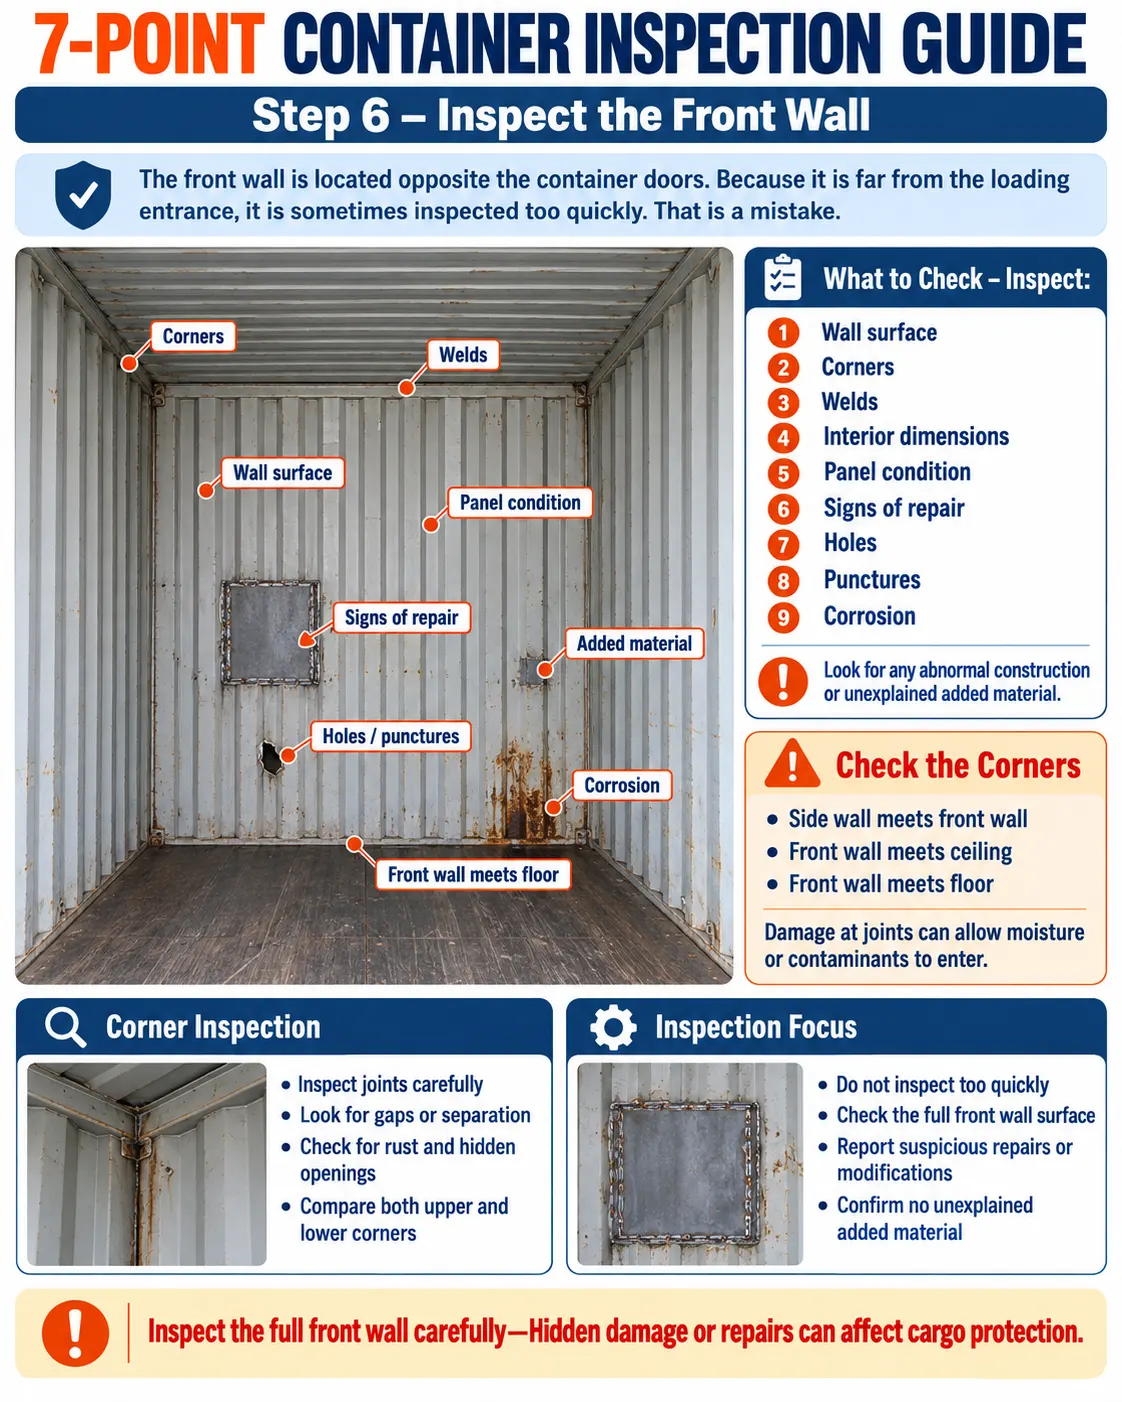
What to Check – Inspect:
- Wall surface
- Corners
- Welds
- Interior dimensions
- Panel condition
- Signs of repair
- Holes
- Punctures
- Corrosion
Look for any abnormal construction or unexplained added material.
Check the Corners – Pay attention to where:
- Side wall meets front wall
- Front wall meets ceiling
- Front wall meets floor
Damage at joints can allow moisture or contaminants to enter.
Step 7 – Inspect the Undercarriage and Exterior
The final step is to inspect the outside and lower structure of the container. This area is important for both structural condition and supply-chain security.
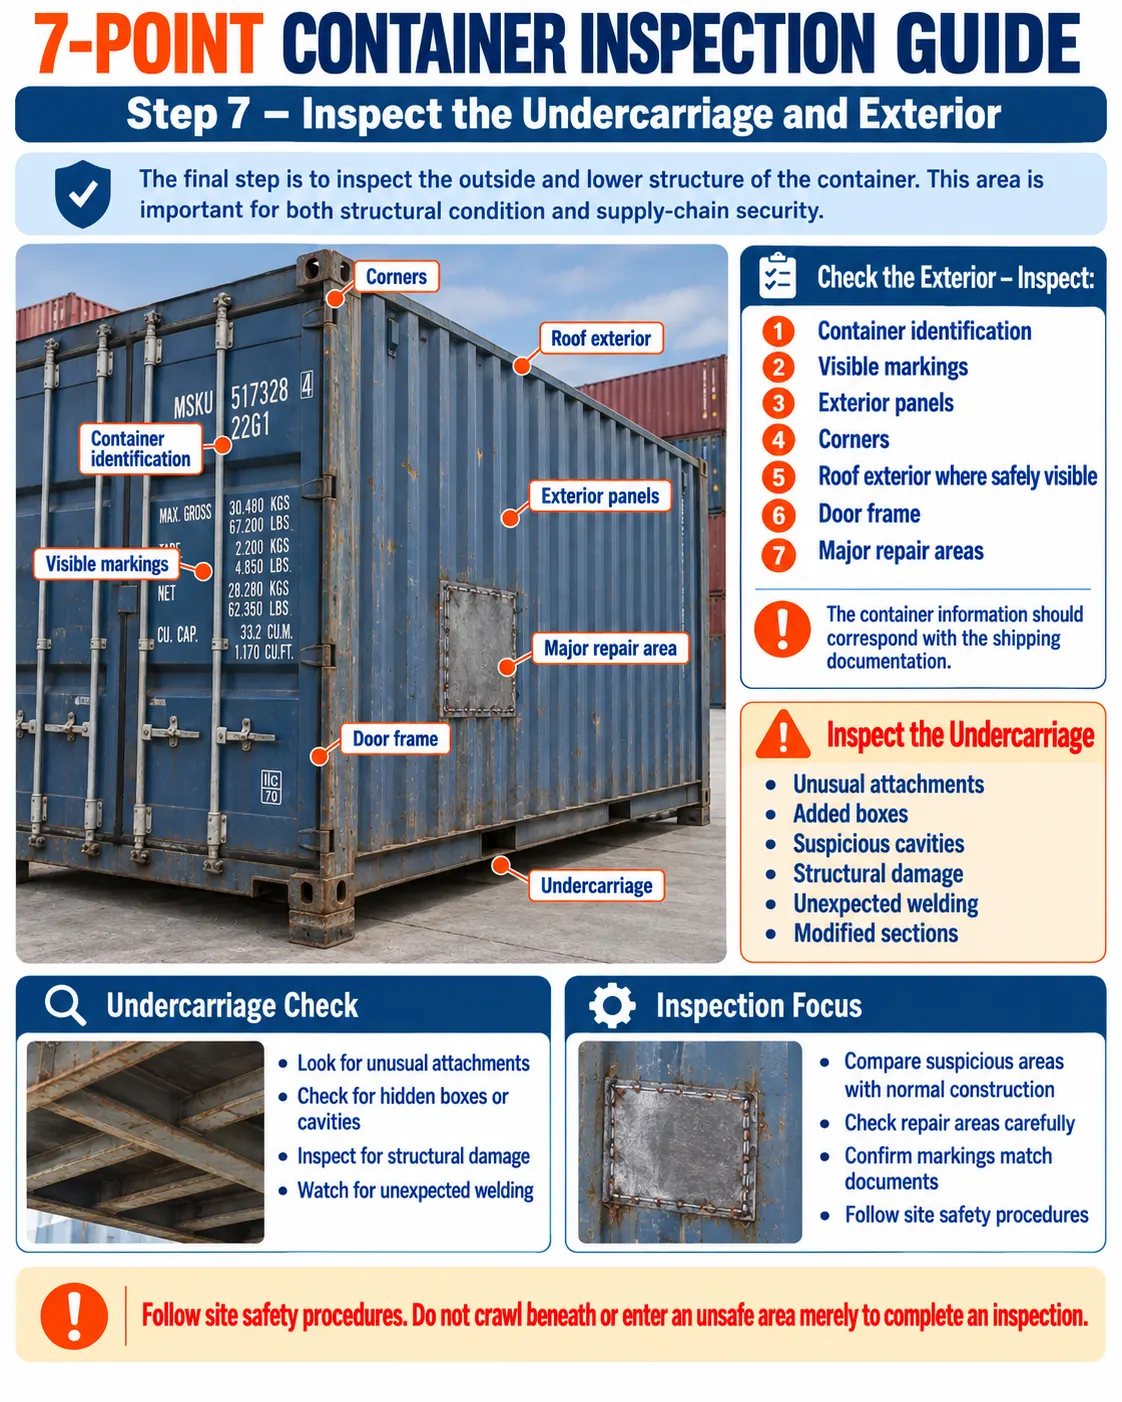
Check the Exterior – Inspect:
- Container identification
- Visible markings
- Exterior panels
- Corners
- Roof exterior where safely visible
- Door frame
- Major repair areas
The container information should correspond with the shipping documentation.
Inspect the Undercarriage
Where inspection can be conducted safely, look underneath the container for:
- Unusual attachments
- Added boxes
- Suspicious cavities
- Structural damage
- Unexpected welding
- Modified sections
Do not crawl beneath or enter an unsafe area merely to complete an inspection. Site safety procedures should always be followed.
Additional Check:
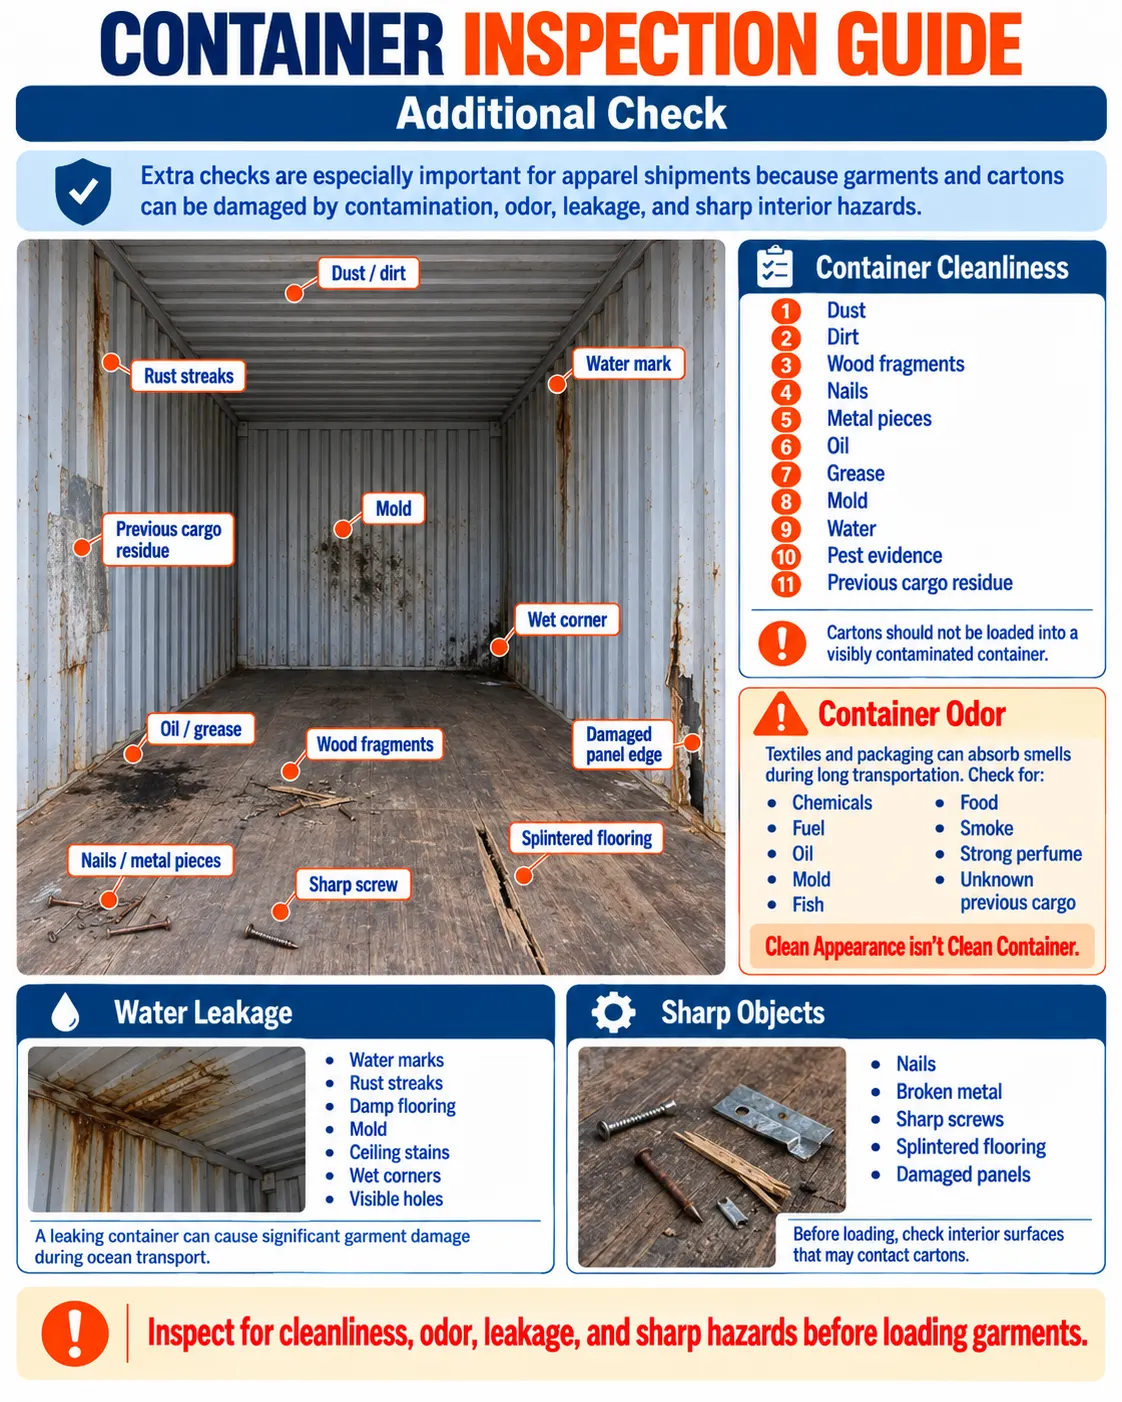
Container Cleanliness
Although cleanliness appears throughout the seven inspection points, it deserves separate attention for apparel shipments. An empty container should be checked for:
- Dust
- Dirt
- Wood fragments
- Nails
- Metal pieces
- Oil
- Grease
- Mold
- Water
- Pest evidence
- Previous cargo residue

Cartons should not be loaded into a visibly contaminated container.
Container Odor
Odor is particularly important for garments. Textiles and packaging can absorb unwanted smells during long transportation. Check for odors such as:
- Chemicals
- Fuel
- Oil
- Mold
- Fish
- Food
- Smoke
- Strong perfume
- Unknown previous cargo
If an odor is strong or cannot be identified, the container should be evaluated before loading. A simple rule is: Clean Appearance isn’t Clean Container.
Water Leakage
The inspection should look for evidence of previous or current water entry. Warning signs include:
- Water marks
- Rust streaks
- Damp flooring
- Mold
- Ceiling stains
- Wet corners
- Visible holes
A container that leaks can cause significant garment damage during ocean transport.
Sharp Objects
Garment cartons can be punctured by:
- Nails
- Broken metal
- Sharp screws
- Splintered flooring
- Damaged panels
Before loading, check the interior surfaces that may come into contact with cartons.
Purpose, Scope & Responsibilities
Purpose
To ensure security standards, prevent tampering, and guarantee that no prohibited items are hidden within the container before loading.
Scope & Responsibilities
This procedure applies to all containers before loading at factories or warehouses.
- Security / QA / QC: Directly inspect and record results.
- Driver / Transport: Cooperate and assist as required.
Quick 7-Point Container Inspection Checklist
| Inspection Point | What to Check |
|---|---|
| 1. Doors & Locks | Hinges, locking bars, handles, gaskets, welds, holes, tampering |
| 2. Left Wall | Holes, dents, cracks, corrosion, unusual welds, light penetration |
| 3. Right Wall | Panel damage, repairs, openings, unusual modifications |
| 4. Floor | Holes, broken boards, oil, chemicals, moisture, mold, sharp objects |
| 5. Roof / Ceiling | Holes, leaks, rust, water stains, abnormal repairs |
| 6. Front Wall | Structural condition, punctures, joints, unusual panels |
| 7. Undercarriage & Exterior | Identification, structure, unusual attachments, damage, modifications |

Conclusion / Final Words
Perform the 7 steps fully to avoid loss and ensure a safe supply chain. Only when the container passes inspection can loading proceed.